Owning a fish tank can be quite a challenge. The challenge remains even on planted tanks, where maintenance is just as important. To have healthy and colorful plants, you need to provide them with the right nutrition. This includes nitrogen, phosphor, iron, micronutrients, and of course, aquarium CO2.
Plants in your tank usually get their CO2 from the fish and bacteria inside. However, seeing that’s not enough, you need to add extra.
This extra CO2 will serve your whole ecosystem in ways we’ll explain below. With our years of experience and with modern means of information, we have compiled everything you need to know for setting up and then using an aquarium CO2 system.
Why Do You Need CO2 in an Aquarium?
It’s inevitable when talking about elements. There must be some chemistry or biology involved. And although not the favorite subject for most, it’s extremely relevant in the world of aquariums.
You know, mitochondria are the powerhouse of the cell and all that. In this case, though, we actually have to remind ourselves of photosynthesis. This process is crucial to plants for it allows them to convert light, water, and CO2 to oxygen and sugar to use them for respiration and also help them grow.
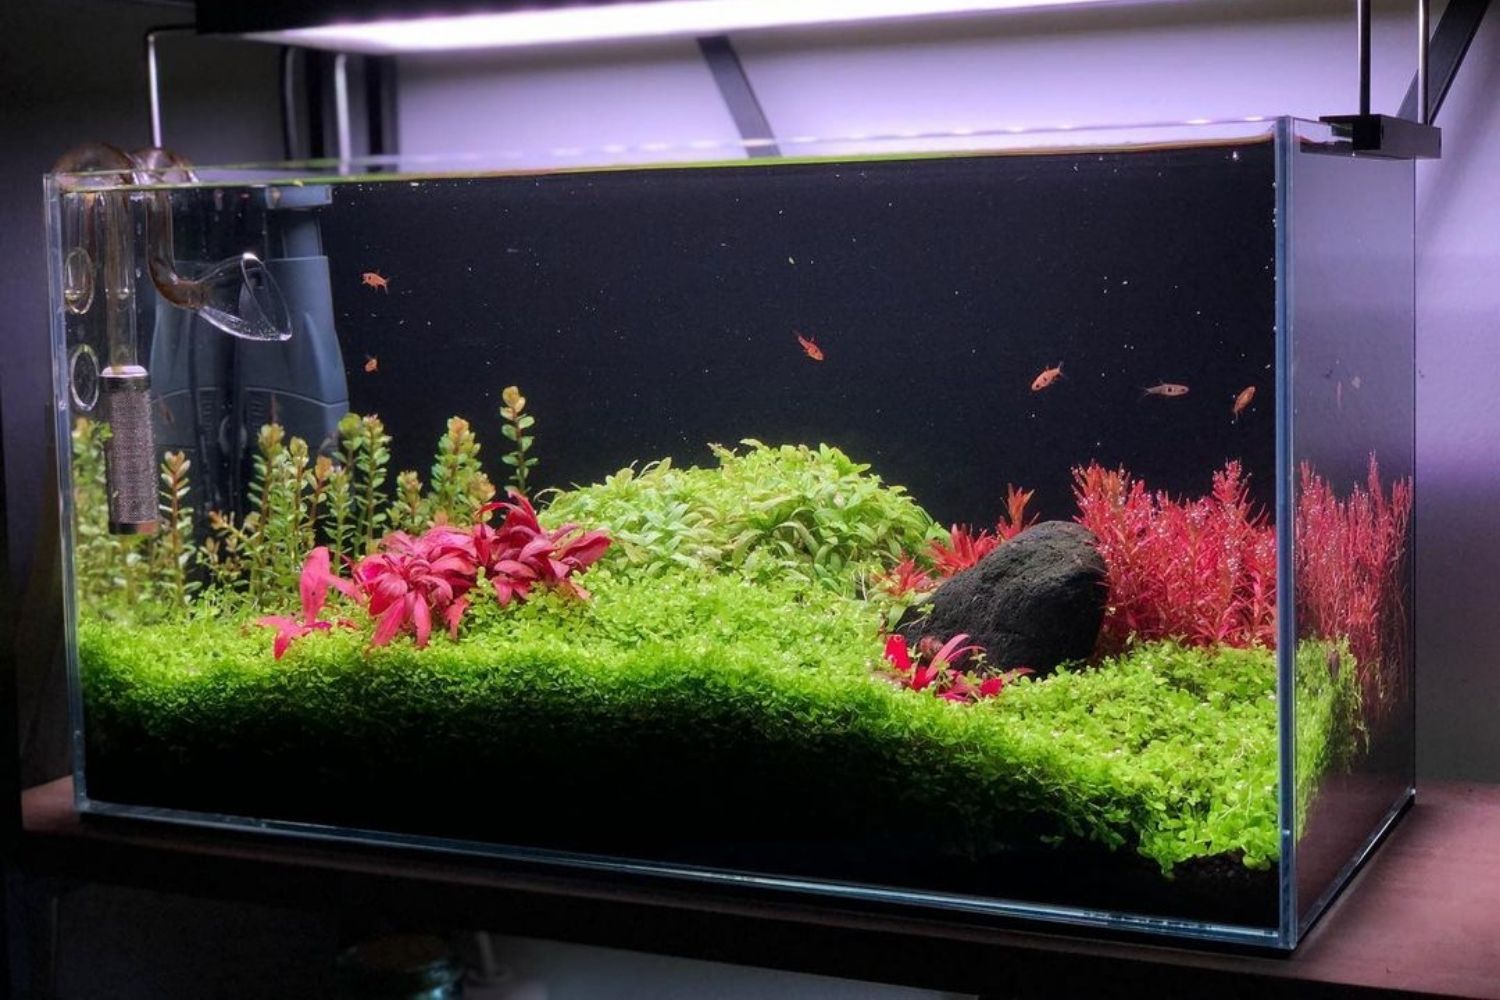
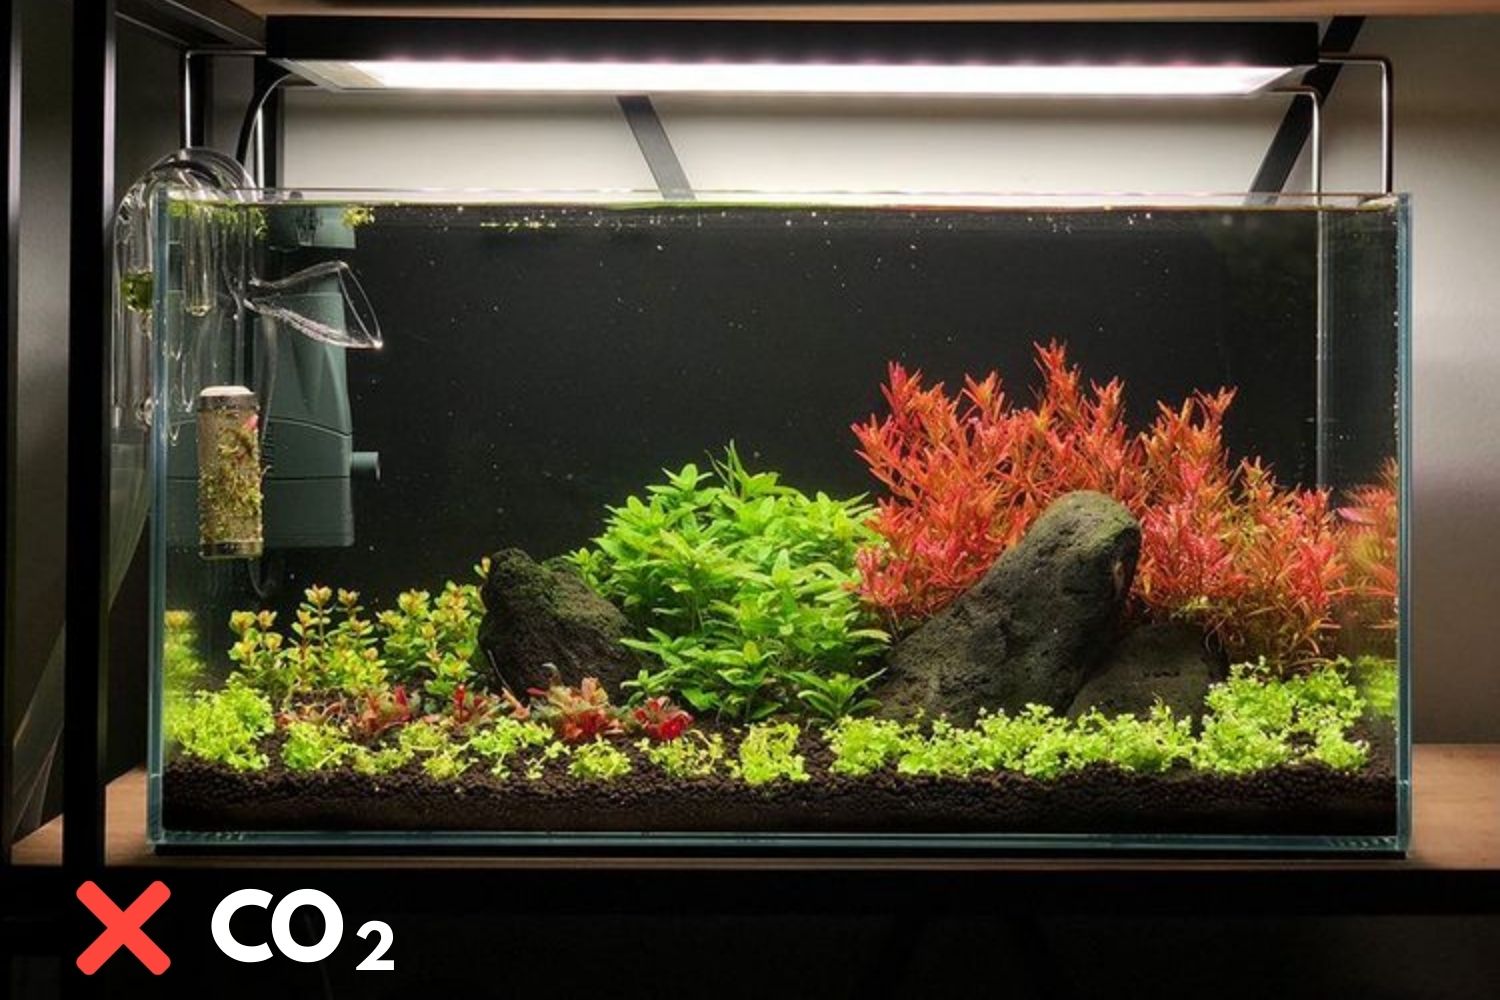
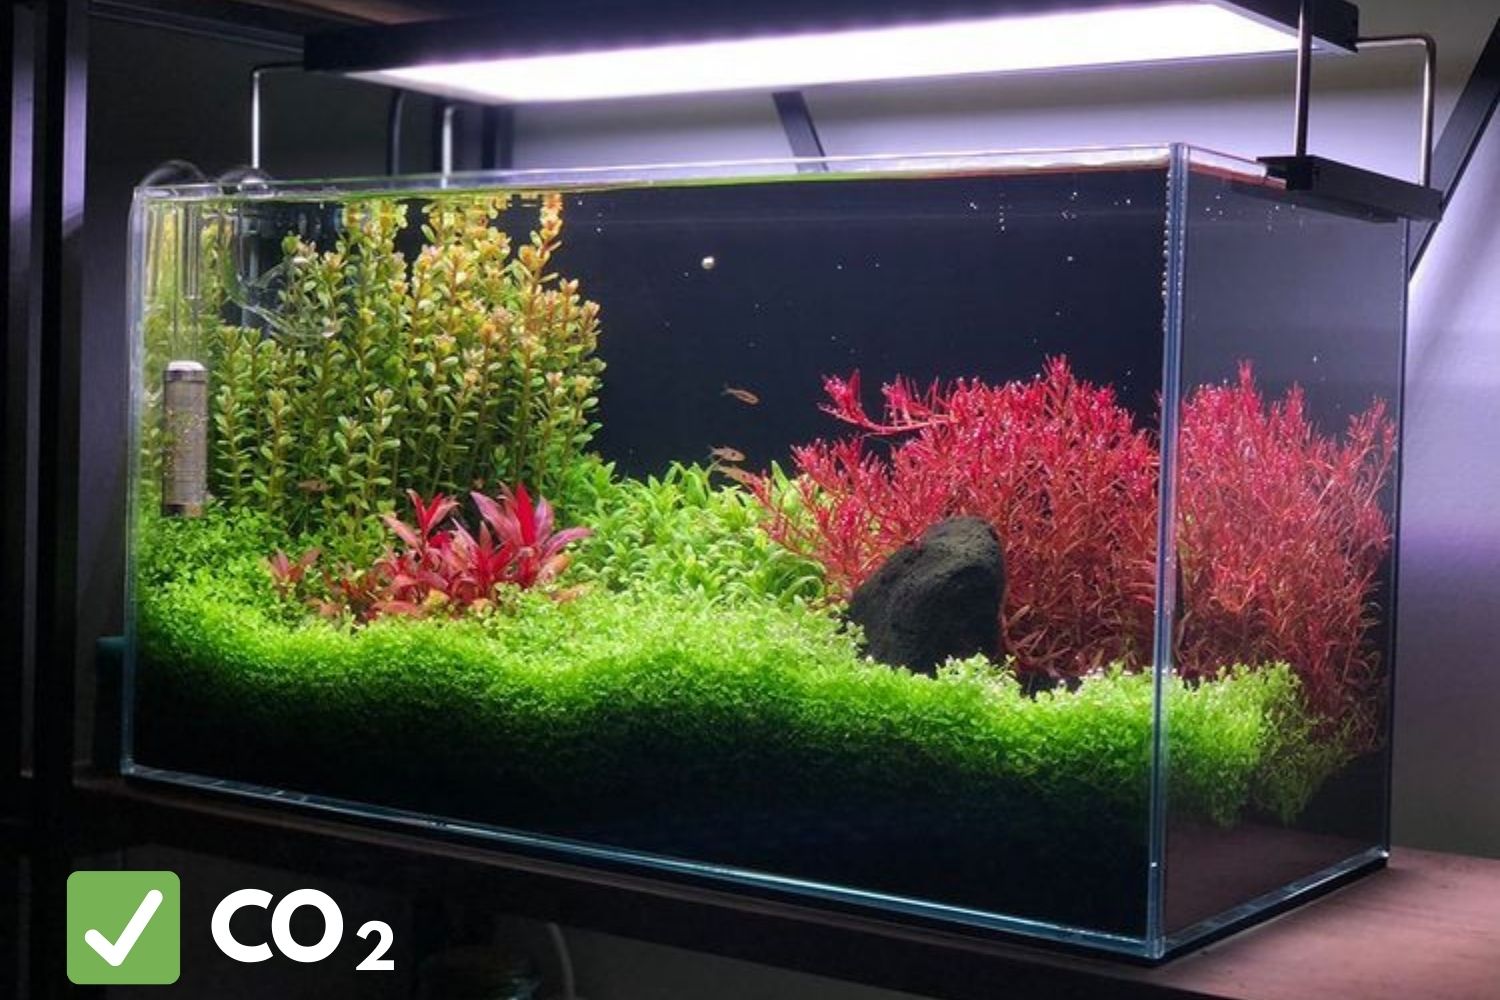
As you might guess, the more CO2 available (although not too much), the faster and healthier plants will grow. However, it’s important to know if your plants need the CO2 and exactly how much they need.
We “divide” tanks on low light and medium/high light. Surely you must’ve come across medium and high light. For these tanks, it’s necessary to add extra CO2, to the point that it can be a deciding factor in your plants’ life.
You might’ve heard before of low-light tanks too. Generally, for these types of ecosystems, there’s enough CO2 due to factors like surface agitation, fish respiration, etc. Either way, even in these tanks, extra CO2 has its own benefits if kept a correct amount.
How Do You Know How Much CO2 Is Too Much CO2?
Well, that depends. In tap water, the concentration of CO2 is around 3-5 parts per million, while the ideal quantity that you’d want to achieve by adding CO2 would be 25-35 ppm. Anyway, that doesn’t mean you’re just going to have to eye it. There are tools that help with measuring the amount of CO2, which will be discussed below.
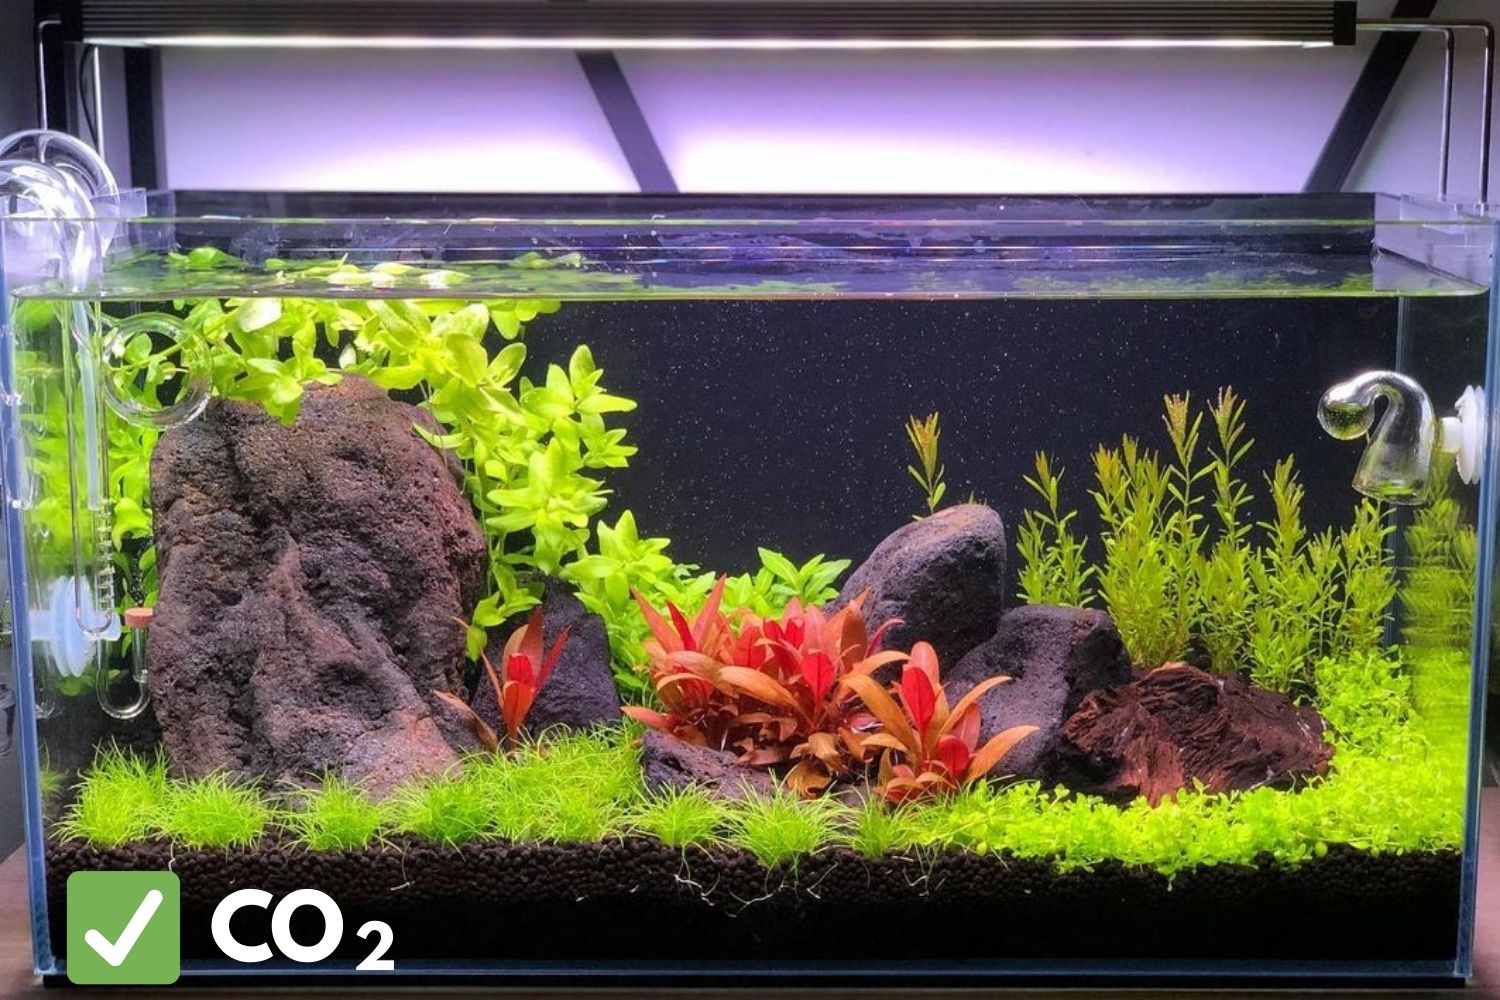
Benefits of CO2 in Planted Tank
But besides vital elements, there are quite a few other positives that come with CO2. All these help in the overall quality of life for your plants and fish. Among others, we can mention:
- Helps to keep plants healthy
- Helps on plant growth
- Minimizes unwanted algae
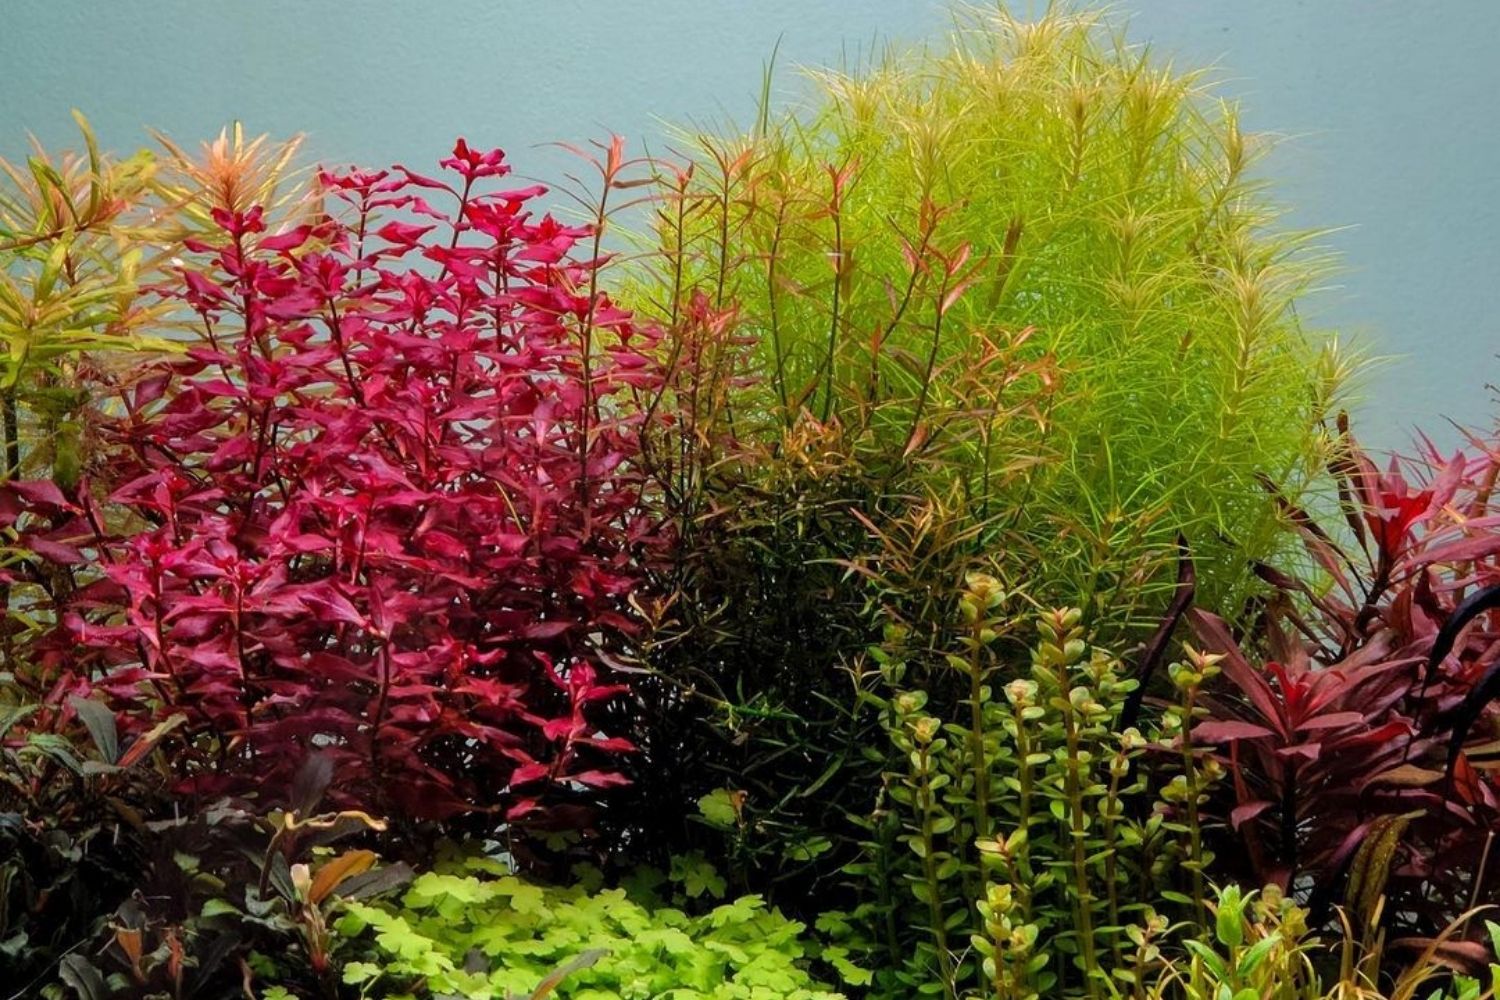
- Enhances plant’s color and vibrance
- Helps for development of carpet plants
Many aquarists hesitate to take on infusing CO2 for their tank due to the maintenance required to make sure everything’s going okay. However, at least to me, the benefits greatly outweigh the maintenance.
Either way, to see better for yourself, below you can read about all you’re going to need to set things up.
Required Tools To Set up an Aquarium CO2 System
Although intimidating for most, a CO2 aquarium only needs you to understand each component well. After going through all the parts, you’ll have a much clearer figure in your head, and all this will become easier to understand and work with.
Another thing to keep in mind is that each item does its job, and although you can mix the components around, in the end, it’s better if you purchase all that’s necessary and not to leave anything to coincidence.
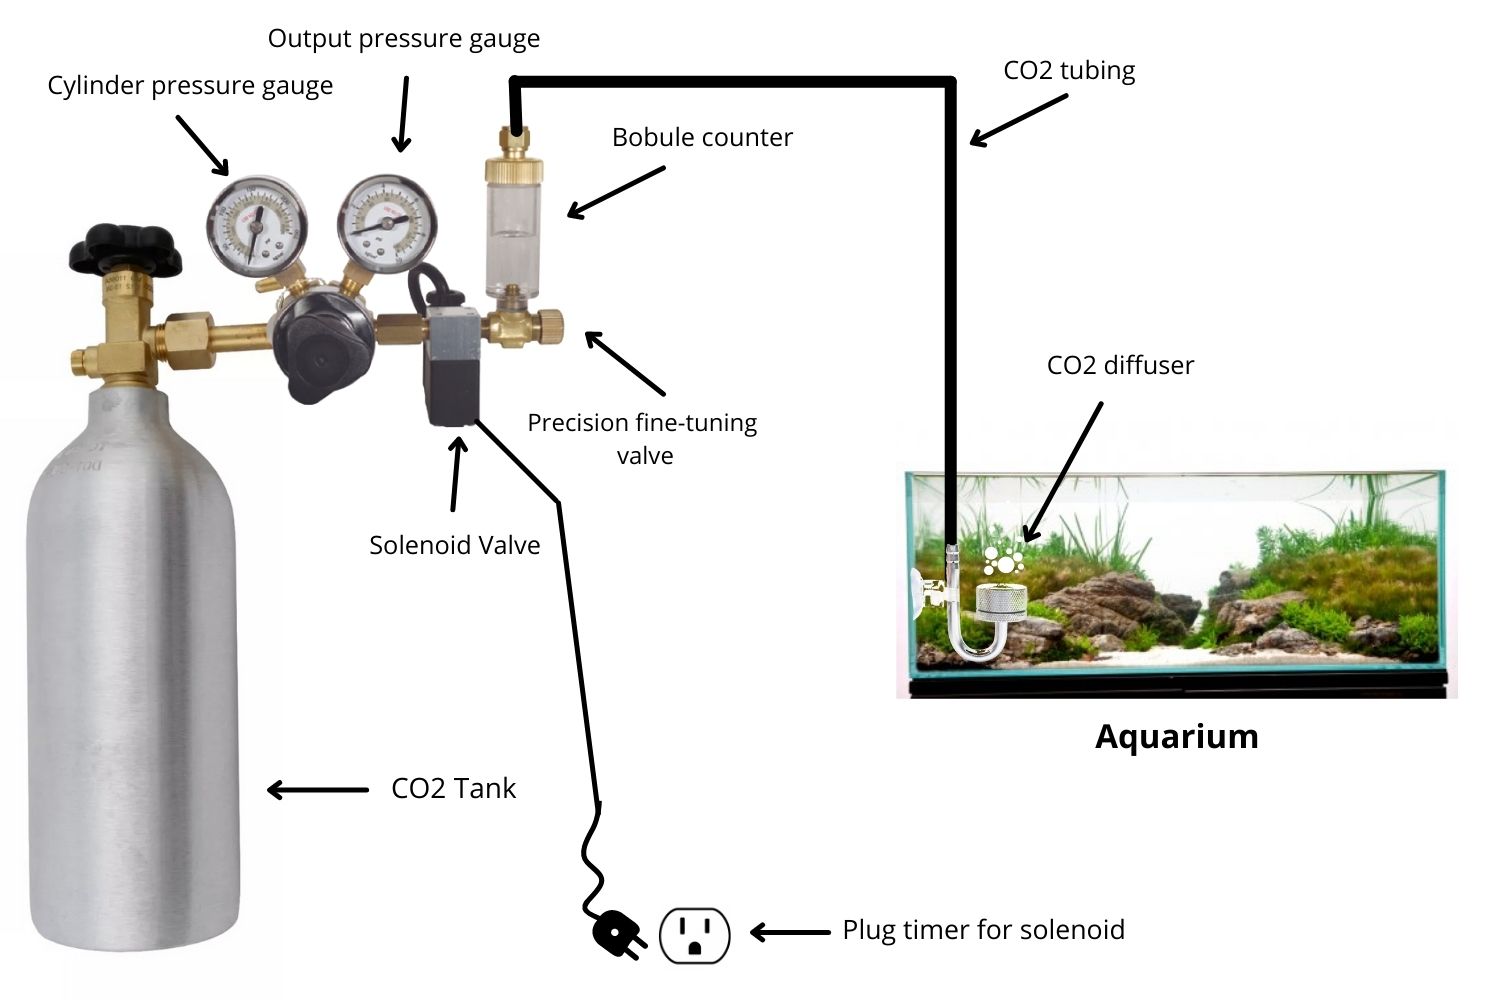
CO2 Tank
Fairy, this would be the most important piece of the setup and equally the easiest one to understand and operate. This is essentially the container of your CO2 and is often shaped like a water bottle, just larger and, well, metallic.
However, there are a few things to choose from, the better ones, in my humble opinion, being either a traditional tank or a paintball tank for aquariums smaller than 30 gallons. If you own a larger aquarium, it would be wiser to go for a 5 lbs or more traditional tank. Obviously, the larger the bottle, the longer you will have CO2 for your tank, also saving you quite some money since it’s more economical to fill up.
As for filling up, you’re going to have to consider what’s nearby for you to make a wise choice. When purchasing a paintball tank, you’re going to have to fill it up at an airsoft store.
Unluckily, there are not many of those around, meaning you might have to drive to the nearest one in town. And when you do so, it’ll be best to refill some extra too, so you won’t have to go as often.
For the other option, you’re going to have to look for either a brewing store or a welding supply nearby and ask them if they can fill your tank up or even swap it. Make sure to do all this research before you get your tank because you will have to fill them up yourself since they ship empty.
CO2 Reactor
A CO2 reactor, instead of what a diffuser would do, simply collects the water in a separate container and mixes it with the dioxide in order to diffuse it 100% in the water. After that, the CO2-infused water is released back into the tank. It’s a great way to put CO2 in a tank, and it’s inexpensive while also keeping less room for error.
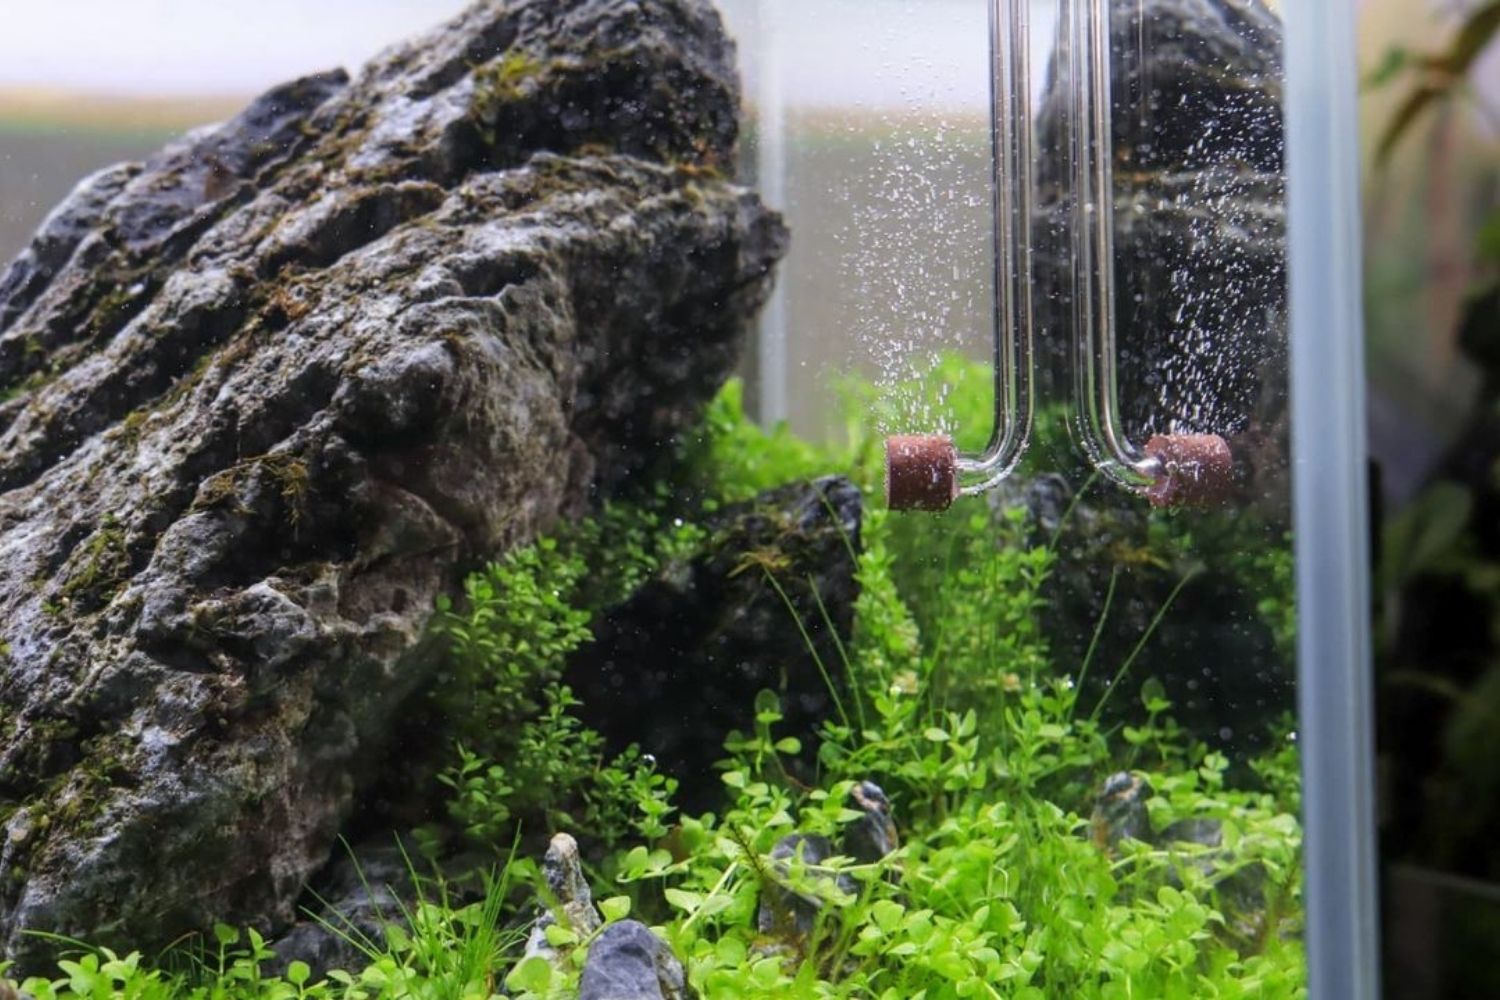
CO2 Diffuser
Now, unlike the reactor, the CO2 diffuser doesn’t mix the water with the CO2. Instead, it will simply transform and optimize the gas to enter the aquarium in a usable form. It works thanks to a porous ceramic that the bubbles pass through and diffuse into tiny bubbles, which then are dissolved into the water when the surface area increases.
This means that the CO2 is dispersed equally throughout the whole water in the aquarium. Diffusers come in two types, in-line and in-tank. As you may guess, the in-tank ones are positioned inside the tank, while the in-line ones are operated from the outside with a canister filter. The ones in-line have a better absorption rate for the CO2 in water and are generally easier to maintain.
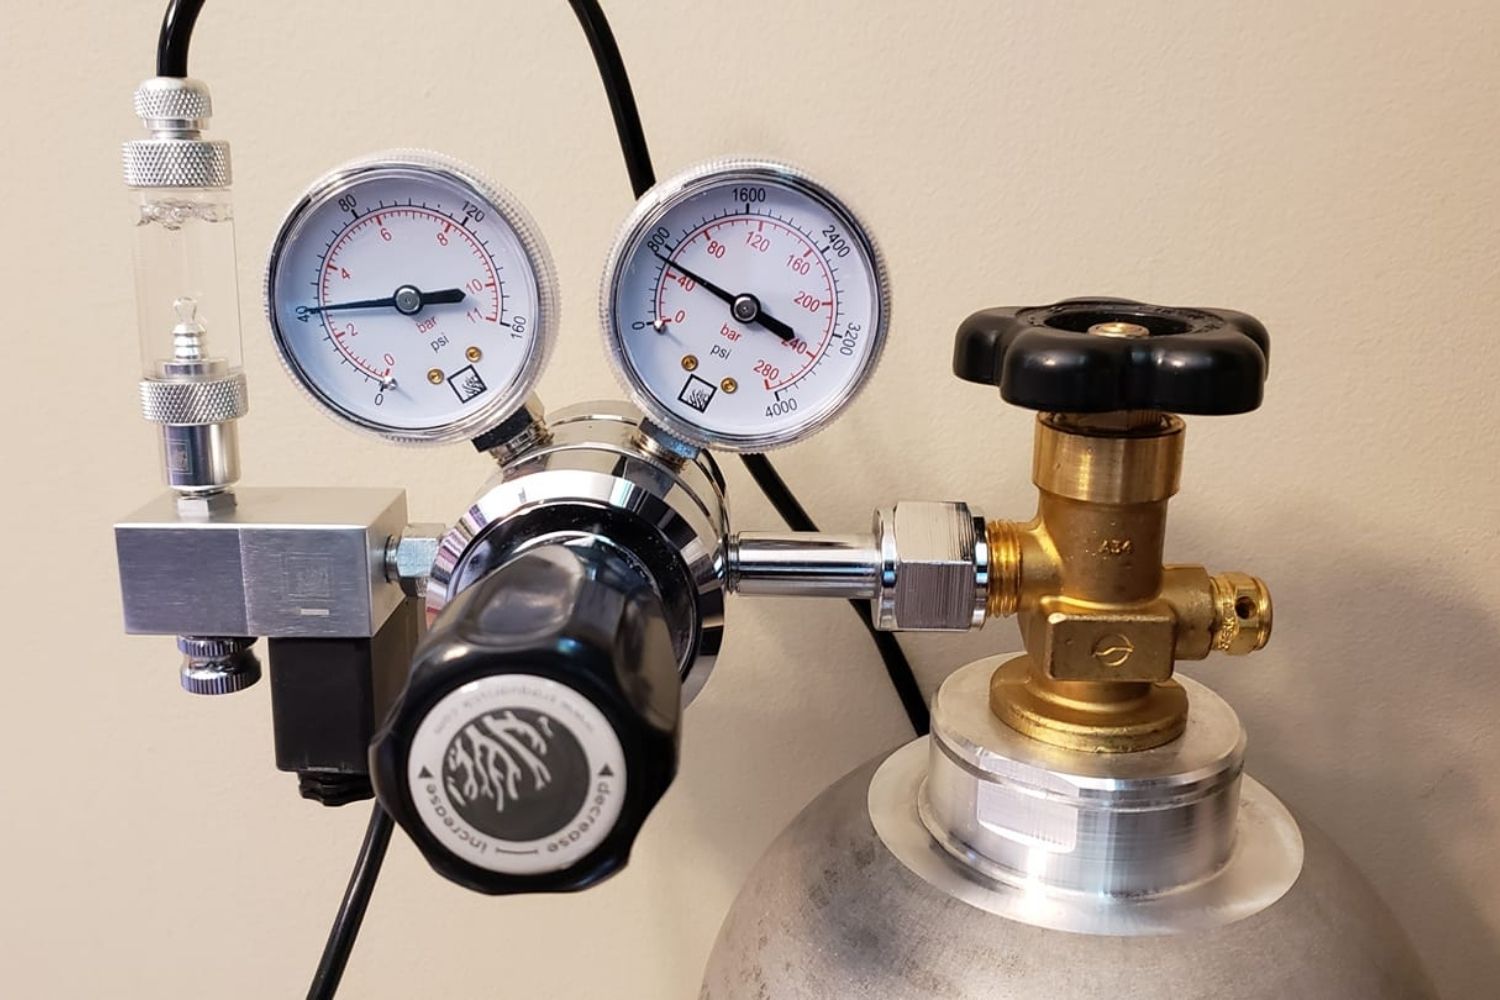
CO2 Regulator
A CO2 regulator essentially helps to reduce the high pressure to a controlled amount. We’re talking about 800 to 1000 psi, the pressure taken from the cylinder to a 1-40 psi output. The most important component of a regulator would be the solenoid valve which electromechanically turns the output of CO2 in the tank on and off.
Bubble Counter
The bubble counter is just as fun as it sounds. It represents the amount of CO2 that’s going in your aquarium. They can either be a part of the CO2 diffuser, attached to the regulator, or just in line with your tubing. It’s definitely one of the easiest ways to view and monitor how much CO2 enters your tank.
CO2 Tubing
The tubing attaches to the regulator and goes to your aquarium. It’s usually formed of a simple, clear vinyl, but you can definitely get all sorts of colors to differentiate adjustment knobs if the system is going on multiple tanks.
This tubing can also be leak-proof if you go for a special CO2-proof version. Some regulators even make this tubing connect directly to the bubble counter.
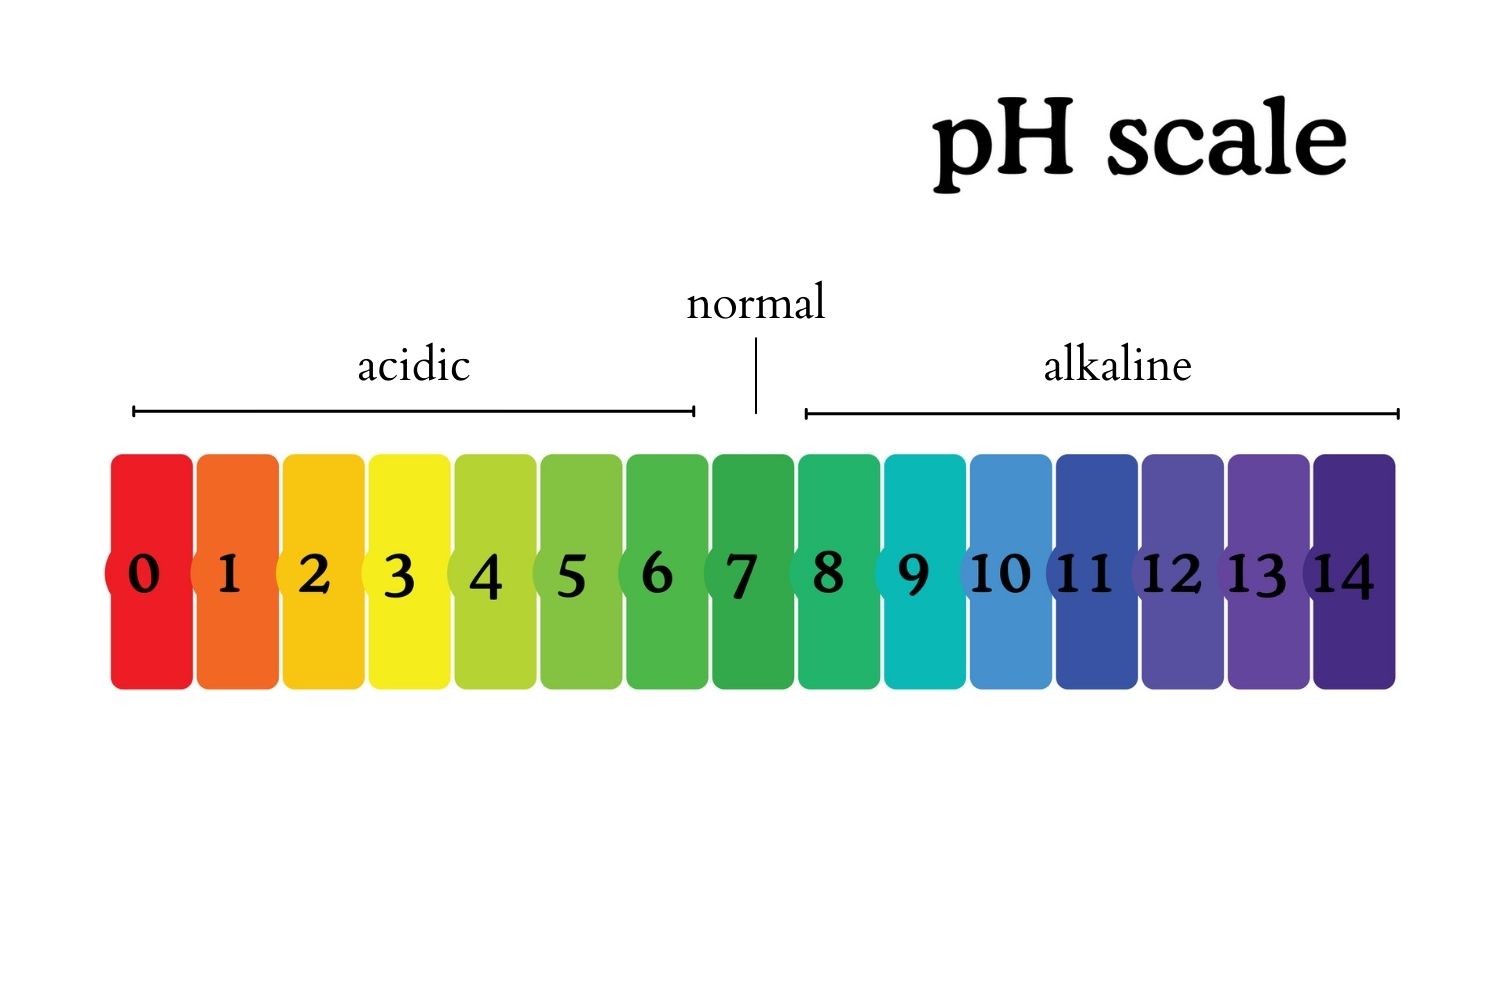
CO2 Drop Checker
A drop checker is what helps you give an enforced idea of the amount of CO2 levels in your aquarium. Regardless of whether you use a pH controller or a timer, this is also necessary to assist you. This tool is a simple glass container filled with KH, which is an indicator.
CO2 submerges to be absorbed in the solution until the amount of CO2 in both the aquarium and container has reached an equilibrium. While the CO2 gets absorbed by the solution, the latter lowers its pH by also changing color. This color helps you identify, thanks to a pH color chart about the accurate concentration of CO2. The drop checker is especially recommended if you use a pressurized CO2 system.
How To Set Up An Aquarium CO2 System: Step By Step
Setting up a CO2 system might seem intimidating. However, it’s really easy once you understand the components. Granted, you’ve understood all that’s mentioned above. You will be able to set up your first system right after this.
Set up the Regulator
The first thing to do when setting up your CO2 system is to take care of the regulator. As we said earlier, the CO2 regulator helps adjust the pressure of the CO2 that gets in the tank without draining it right away.
Some things to keep in mind about this would be to let it go to room temperature. This means that you’re not supposed to put the regulator right away in the CO2 tank. Instead, you should wait for the metal to either warm up or cool down depending on its temperature until it’s equated with your room’s temperature.
Attaching the Solenoid
After that, attach the solenoid (make sure it’s turned off so CO2 won’t leak) to the regulator. Then you can finally attach the regulator to the tank. While doing that, make sure to hold it intact while you’re turning the nudge, so it’s easier.
It’s recommended that after you’ve secured it loosely, use a wrench to tighten it snugly. Personally, I like to keep the operating pressure at around 40 psi.
Putting on the Check Valve
Then you attach the check valve, and then you put it right on the water level. It’s important to do so whenever you turn the lights off. Water won’t be clogged at the tube, building up the pressure, which could take an hour before it gets all the water to the tube.
Inserting the Diffuser and Finishing up
Afterward, we have the CO2 diffuser. Make sure it’s snug on the tube, and then just proceed as you normally would. Now you can say you’re done, and you can enjoy your new CO2 system.
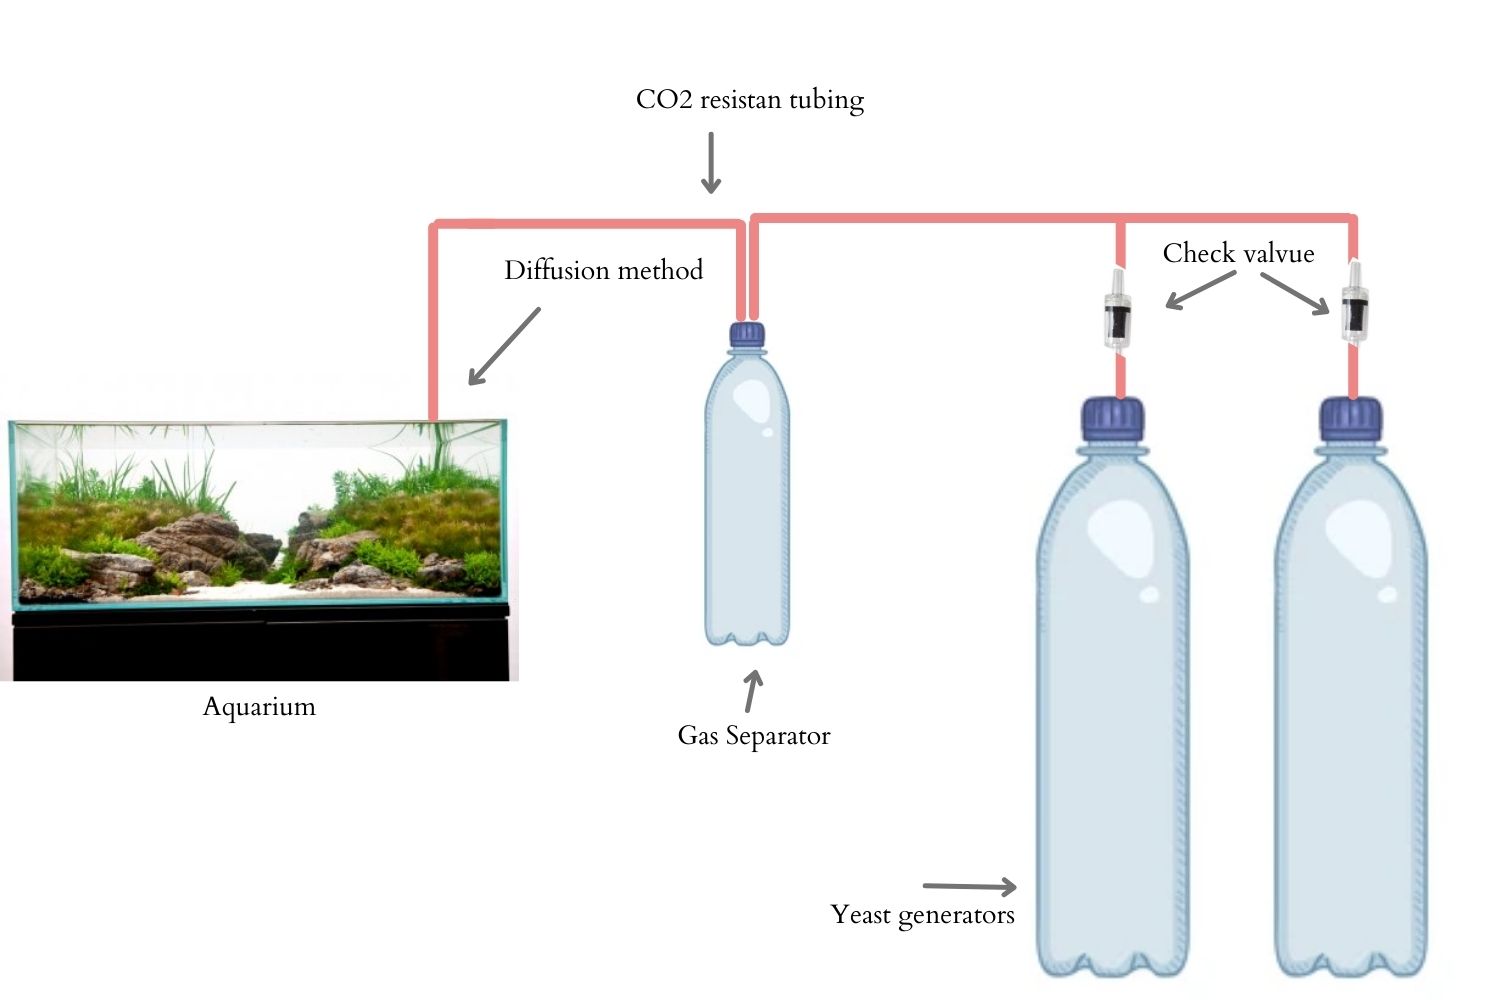
DIY CO2 Aquarium
Sometimes, and actually, really often, I’ve come across people that just don’t believe in anything that they don’t do themselves. And that’s totally acceptable, granted the know-how. If you’d rather do everything with things that you definitely have access to around you, we’re glad to help.
Required Tools:
- Container/bottle
- Tube
- Diffuser
- Check Valve
- Airstone
- Suction cup
- Water, sugar, and yeast
List of Steps
- Take two water or soda bottles that are somewhat large and wash them out. Make sure there’s no residue and it is clean and presentable because it most probably will be somewhat visible. If you want, you can totally customize it to your liking.
- Punch a hole into the cap of the bottles. You could use a knife, scissors, or whatever you have most accessible if the hole is circular and large enough to fit the tubing inside. You can achieve widening the hole by twisting the knife. Just be sure not to overdo it or hurt yourself.
- Cut the tubing at an optimal angle to be put in the hole and go an inch or so inside the bottle. You don’t have to put it deeper in the bottle and definitely not closer to the surface, for it will be more difficult to seal. As for the whole length of the tubing, it depends on your setup. A single bottle setup should have a longer tube since it will go from the bottle to the aquarium itself, whereas a dual setup has to be long enough to reach the other bottle.
- Use the silicone used for aquariums and cover the extra space on the hole where you inserted the tubing to create a seal. This airtight seal has to be tight and not allow any leaks of CO2 from the bottle. After you apply the silicone, you should wait for 5 to 10 minutes so it can be properly set.
- (Skip if you’re using just one bottle) Re-follow the steps above to make another bottle identical to the first one. To connect the tubing together, you should use a T-splitter that basically forms a triangle top by connecting the two tubings together and, therefore, joining bottles. This will channel the CO2 from both bottles to a third airline tube.
- (Skip if you’re using just one bottle) Get a third piece of tubing and cut it properly for it to stretch from the T-Splitter all the way to your tank. After cutting your airline tubing, attach it to the T-Splitter. Now you should almost have a big rectangle split into two smaller rectangles sharing aside.
- Get your check valve and make sure to put it in the right direction. The orientation of the arrow should be in the way the CO2 flows, so pointing at the tank and based at the bottles. Cut a line from the T-splitter (or the soda bottle if you’re using just one) to the tank. The valve can be positioned anywhere between the aquarium and the bottles. However, I prefer to put it closer to the bottles since it’s easy to maneuver from. If the pressure runs out (like when the CO2 is over or switched off), the Check Valve will prevent water from going through the tank line, or if you’re removing the cap from a bottle, it’ll allow just one direction of flow.
- Attach the aeration stone right where the tubing ends. This will get out a fizz of CO2 that dissolves way faster than the large bubbles of CO2 that go through it before it breaks them down. Actually, the problem with most CO2 setups that are DIY stands exactly at the CO2 dissolving. The bubbles sometimes aren’t submerged long enough to dissolve. A way to correct this is by putting your aeration stone in places like the intake of a canister filter that will mix the CO2 before going into the tank. Or you can place the stone near the filter’s flow or the aquarium powerhead that produces strong currents to help the bubbles stay submerged.
- The only thing that’s left, and definitely the most important one, is CO2. That’s where the yeast and sugar come in. These two, by following a recipe, react with each other producing the precious CO2 for your tank. It’s obviously not as big of an amount as a system you’re going to have to do. This mixture will last you 1 to 2 weeks before needing to add more sugar and yeast. And on the dual setup, there’s the benefit of only having to change one bottle every 1 or 2 weeks.
Liquid CO2 for Aquarium
Many aquarium firms sell liquid carbon, commonly known as liquid carbon dioxide or liquid CO2. We have already learned that CO2 helps in controlling algae growth in the aquarium. Plants frequently develop quicker and healthier when fewer algae compete for nutrients, light, and carbon dioxide.
But what makes this better?
CO2 systems like the one we’ve been talking about so far are more costly but more dependable and regulated.
Liquid carbon, on the other hand, takes a little less time to set up and maintain. However, it compromises plant growth, which is slower since it doesn’t provide carbon as efficiently as a CO2 system.
FAQs
Building a CO2 system for planted tanks isn’t easy, and everyone can be left with some unanswered questions. We will try to answer the most common ones about these co2 boosters!
Q: How much does an aquarium CO2 system cost?
A CO2 system can range in price. However, the average cost comes down to around 200 bucks, with an additional $5 monthly to refill CO2. You can go for more quality items that will up the price to $400 or cheaper ones that might cut it to half. That all depends on your budget and how much you’re willing to invest.
However, if you find it hard to invest in a CO2 system right now, maybe hold off on getting that planted tank until you set some money aside.
Q: Is CO2 safe for fish?
Just like plants, even other aquatic creatures are in vital need of O2 and CO2 to survive. Fish also need CO2 in order to survive, as long as it’s in recommended amounts. However, too much CO2 increases the acidity of the water, making it toxic and harmful to the fish to the point where they might die.
The average amount of CO2 in a tank is around 30 parts per million for most aquatic life living in a tank. If you deviate a lot from that amount, you may put your fish in danger and harm the health and longevity of your plants.
Q: How do I increase CO2 in my aquarium naturally?
There are a few ways to go about this, but a good idea would be a gas infuser kit. It contains no chemicals, and it’s a great solution if you’re looking for a constant flow of CO2. The way it works is by a diffusion system that transfers the CO2.
You run the gas underwater after plugging in the pump for the infuser to make the gas’s dissolving easier. Other sources include fish waste and bacterial respiration. However, these aren’t enough to produce the right amount of CO2 for plants to grow.
Q: Do fish provide enough CO2 for plants?
For low to moderate light plants, fish produce just enough CO2 to provide a normal living environment for plants. However, for anything more than that, you’re going to need to inject CO2 in one way or another. Especially if you’re going for a dense collection of plants.